> ## Documentation Index
> Fetch the complete documentation index at: https://docs.gnani.ai/llms.txt
> Use this file to discover all available pages before exploring further.
# Integrating Gnani Agents with Webex Contact Center
Leverage the power of Gnani Agents seamlessly within your Cisco Contact Center workflows. Gnani Agents integrates with Webex Contact Center through Cisco’s **Service App** framework. Once set up, you can use Gnani Agents inside the Webex **Flow Designer** to handle customer interactions seamlessly.
As an Admin, here’s what you need to do:
## Service App Creation: Admin Flow
### Step 1: Go to Service Apps in Control Hub
* Sign in to your Webex **Control Hub**.
* Navigate to **Management → Apps → Service Apps**.
### Step 2: Locate the Gnani Agents Service App
* You will see **Inya AI Agent** listed as a Service App available for your organization.
* Click on it to review the details and scopes requested.
### Step 3: Authorize the Service App
* Click **Authorize** to enable the Inya Service App.
* This grants the app the required permissions to function within your Webex environment.
### Step 4: Confirmation
* Once authorized, the Gnani team will complete the backend setup.
* You can now add Gnani Agents directly in the **Cisco Contact Center** **Flow Designer** to manage customer calls and chats.
## After Authorization
* No further configuration is needed from your side.
* The Gnani **team** will handle credit setup and ensure that your AI agents are active.
If you face any issues or need more credits, contact us at [**hello-inya@gnani.site**](mailto:hello-inya@gnani.site).
That’s it, with just a one-time authorization, your organization can start using Gnani Agents inside Webex Contact Center workflows.\
\
We'll assist you with:
* Purchasing and allocating required credits
* Completing backend setup and Webex deployment
* Verifying that your Gnani Agents are active within the Contact Center flow designer
## To add the Gnani Agents Transcript widget to the Desktop Layout:
1. Login to Cisco Webex Contact Hub Desktop as an Administrator
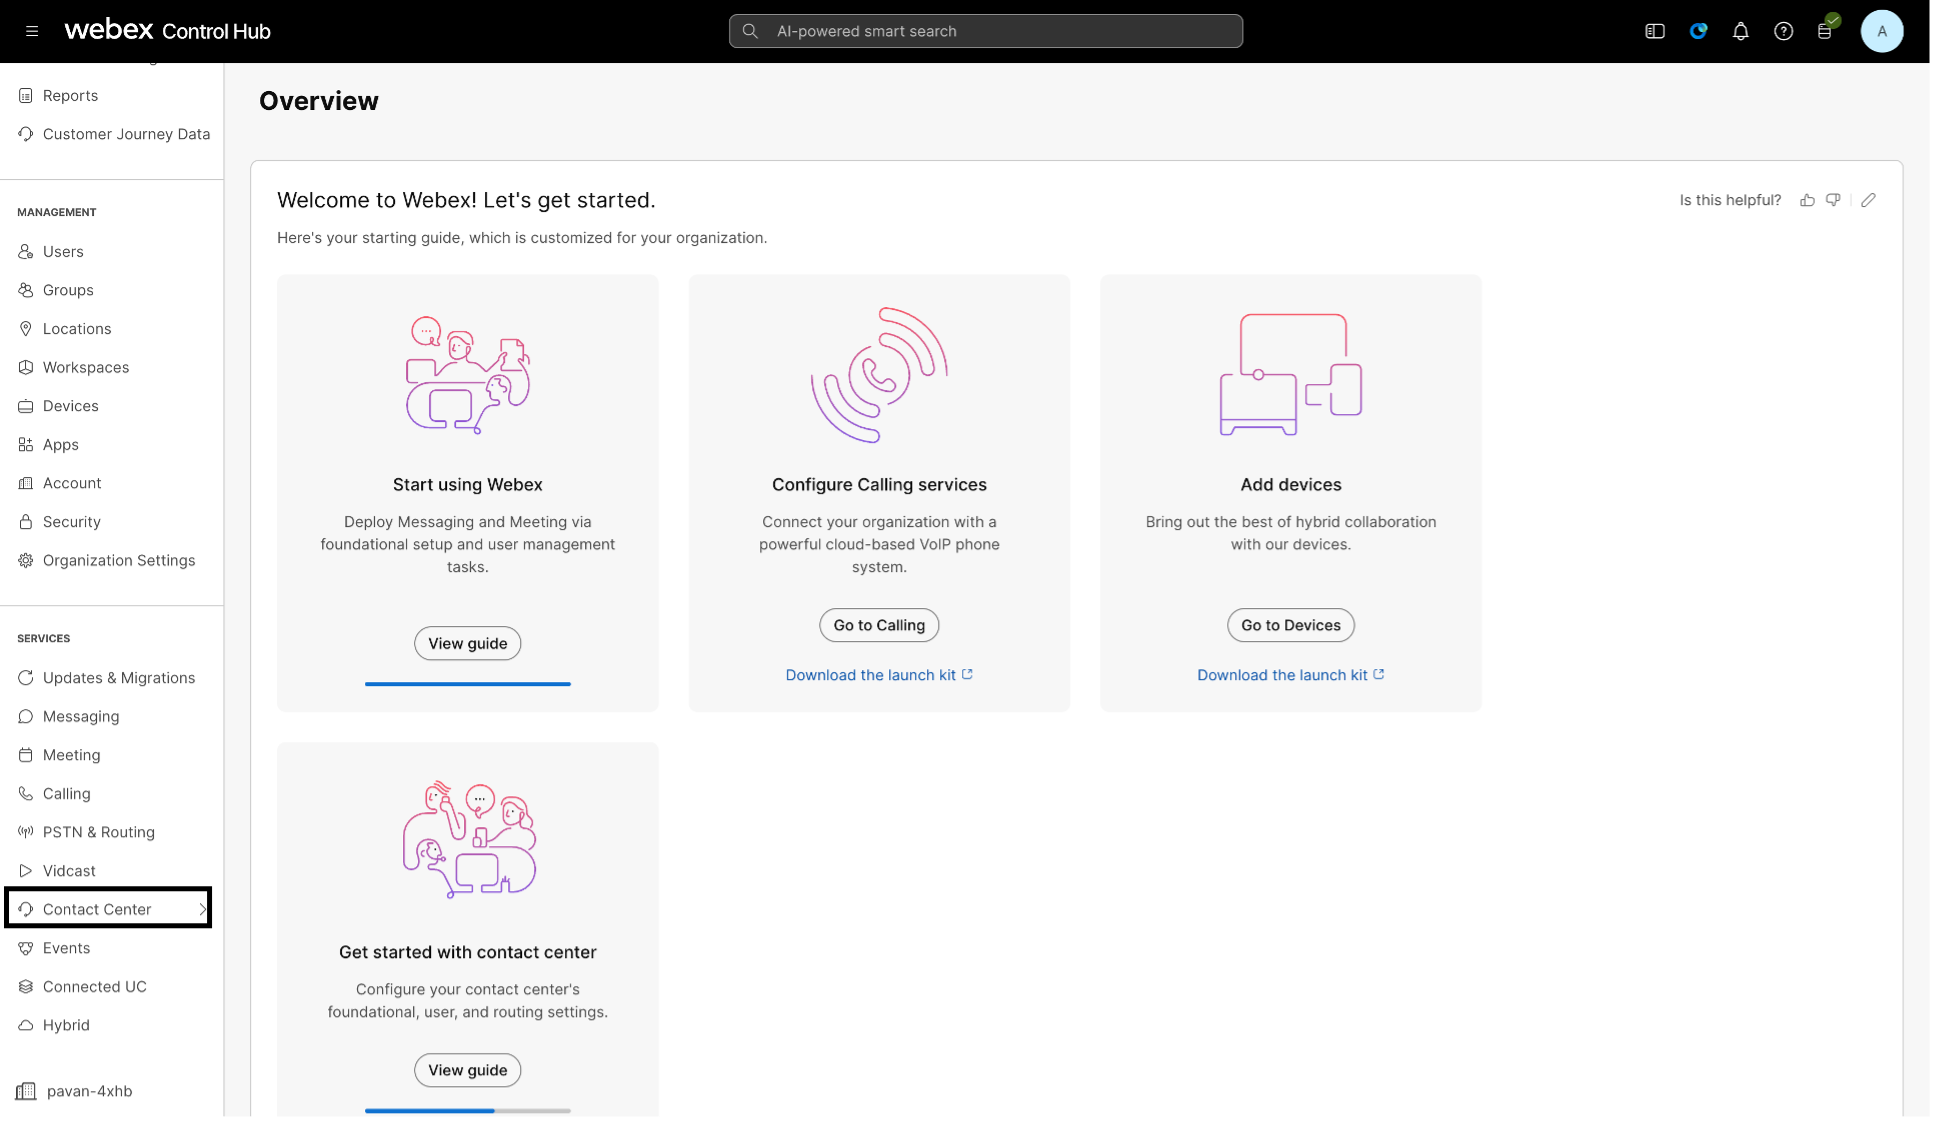
2. Click on **Contact Center** under **Services** on left pane, and then go to **Desktop Layout** under **Desktop Experience**
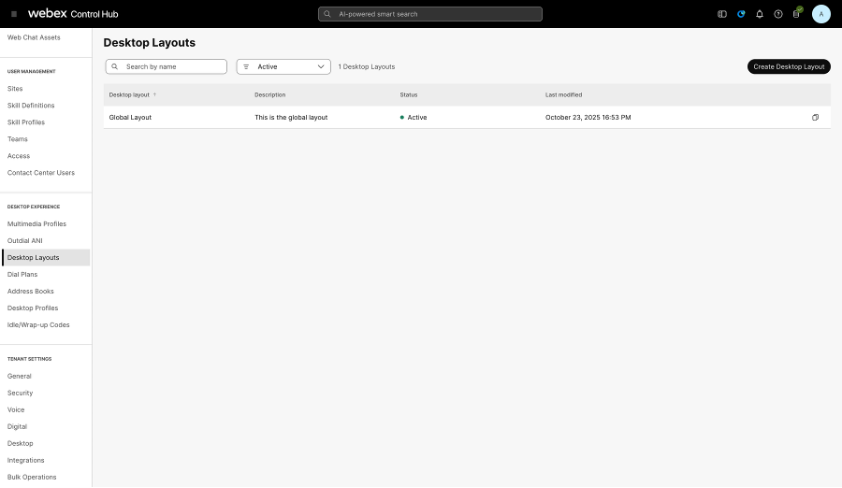 3. From the desktop Layouts page that opens, select the layout you want to edit.
4. Click on the download button next to the already uploaded JSON file to download so that you can edit it.
3. From the desktop Layouts page that opens, select the layout you want to edit.
4. Click on the download button next to the already uploaded JSON file to download so that you can edit it.
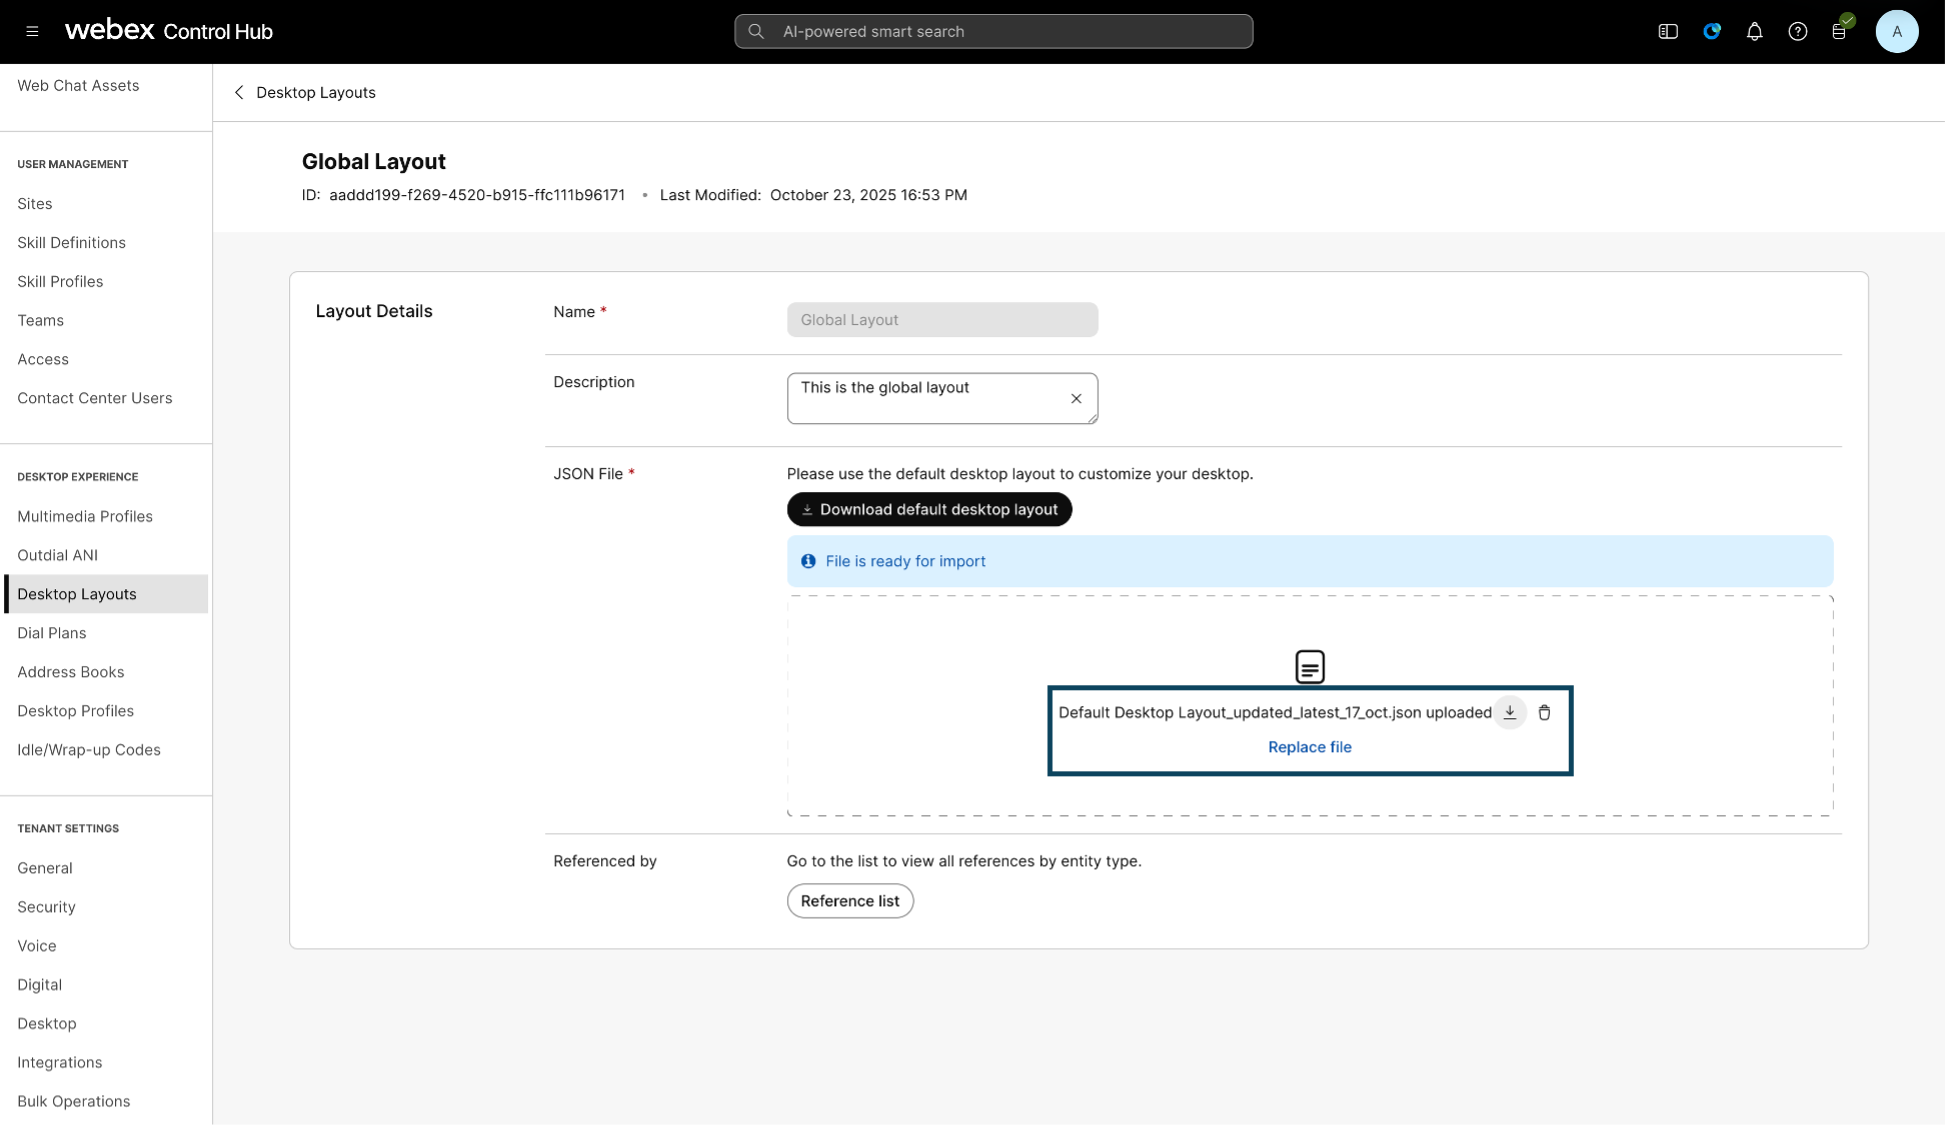 5. In the .json file, add the following details to create another tab for the Inya Transcript Widget to show up under “agent” > “area” > “panel” > “children” array
```json theme={null}
{
"comp": "md-tab",
"attributes": {
"slot": "tab",
"class": "widget-pane-tab"
},
"children": [
{
"comp": "slot",
"textContent": "Inya Transcript",
"attributes": {
"name": "INYA_TRANSCRIPT_TAB"
}
}
]
},
{
"comp": "md-tab-panel",
"attributes": {
"slot": "panel",
"class": "widget-pane"
},
"children": [
{
"comp": "dynamic-area",
"attributes": {
"name": "INYA_TRANSCRIPT"
},
"properties": {
"area": {
"id": "inya-transcript",
"widgets": {
"inya": {
"comp": "inya-transcript",
"script": "https://genvoice-appdev.gnani.site/sdk/inya/inya-webex-widget.min.js",
"properties": {
"agentId": "$STORE.agent.agentId",
"taskMap": "$STORE.agentContact.taskMap",
"agentName": "$STORE.agent.agentName",
"darkMode": "$STORE.app.darkMode",
"accessToken": "$STORE.auth.accessToken"
},
"wrapper": {
"title": "Inya Transcript",
"maximizeAreaName": "app-maximize-area"
}
}
},
"layout": {
"areas": [["inya"]],
"size": {
"cols": [1],
"rows": [1]
}
}
}
}
}
]
}
```
8. Once changes are done, save the file and upload the file in the Layout
9. Click **Save**
### Summary
By integrating Gnani Agents **with Webex**, you get all the advantages of intelligent, conversational AI embedded straight into your Cisco Contact Center. Just:
1. Set up via the Webex App Hub
2. Create your agents within Gnani Agents
3. Contact us at [**hello-inya@gnani.site**](mailto:hello-inya@gnani.site) for credit setup and activation
4. Insert your agents into Webex’s flow designer to power customer conversations
5. In the .json file, add the following details to create another tab for the Inya Transcript Widget to show up under “agent” > “area” > “panel” > “children” array
```json theme={null}
{
"comp": "md-tab",
"attributes": {
"slot": "tab",
"class": "widget-pane-tab"
},
"children": [
{
"comp": "slot",
"textContent": "Inya Transcript",
"attributes": {
"name": "INYA_TRANSCRIPT_TAB"
}
}
]
},
{
"comp": "md-tab-panel",
"attributes": {
"slot": "panel",
"class": "widget-pane"
},
"children": [
{
"comp": "dynamic-area",
"attributes": {
"name": "INYA_TRANSCRIPT"
},
"properties": {
"area": {
"id": "inya-transcript",
"widgets": {
"inya": {
"comp": "inya-transcript",
"script": "https://genvoice-appdev.gnani.site/sdk/inya/inya-webex-widget.min.js",
"properties": {
"agentId": "$STORE.agent.agentId",
"taskMap": "$STORE.agentContact.taskMap",
"agentName": "$STORE.agent.agentName",
"darkMode": "$STORE.app.darkMode",
"accessToken": "$STORE.auth.accessToken"
},
"wrapper": {
"title": "Inya Transcript",
"maximizeAreaName": "app-maximize-area"
}
}
},
"layout": {
"areas": [["inya"]],
"size": {
"cols": [1],
"rows": [1]
}
}
}
}
}
]
}
```
8. Once changes are done, save the file and upload the file in the Layout
9. Click **Save**
### Summary
By integrating Gnani Agents **with Webex**, you get all the advantages of intelligent, conversational AI embedded straight into your Cisco Contact Center. Just:
1. Set up via the Webex App Hub
2. Create your agents within Gnani Agents
3. Contact us at [**hello-inya@gnani.site**](mailto:hello-inya@gnani.site) for credit setup and activation
4. Insert your agents into Webex’s flow designer to power customer conversations